
Git and Github, Part 3: Pull Requests#
In our previous exercise, you saw how you can make edits to a shared git repository, review those edits, and more!
But there was one major issue with the way we were working with that project — both Computer A and Computer B were modifying the same set of files (the files on the main branch).
If you’re the only person using your git repo, or if there are only two of you working on your project, that may be fine. But git and github are designed for projects with LOTS of users (e.g., all the engineers at Google!), and when there are that many people working, we need a way for people to develop their contributions in a private sandbox and get feedback before they put their code/edits in the main branch. This is especially important because in many environments, the main branch is code that people use on a daily basis! So you can’t put half-baked changes in there.
“So why don’t we just wait until we’re done and then put our code in main?” I hear you asking.
Two reasons. First, that means you aren’t saving changes to the cloud as you work, which creates a risk of data loss. But second, and more importantly, there’s no way for your code to develop without getting feedback, and without a way to share drafts of your work, it’s not clear where that feedback would come from.
Enter Branches and Pull Requests.
Branches#
Branches are essentially parallel versions of a repository. They are created by saying “take the current state of the repository, and make a copy of it in a parallel universe where I can make changes without affecting the main branch.” Branches share the full history of the repository from before the creation of the branch, but from the point of creation on they are allowed to diverge. Changes on the main branch don’t appear on your new branch, and changes on the new branch don’t appear on the main branch.
Pull Requests#
OK, but… then how does my code eventually get back into the main branch? And how do I get all this feedback you talked about? Pull requests!
A “Pull Request” (often just called a “PR”) is a request to have the code you’ve been working on in private reviewed and — if it is deemed ready — pulled back into the main branch. In other words, a Pull Request (PR) is the mechanism by which the code you developed on your own branch is checked over and reviewed before it is allowed to be integrated into the main branch. Basically, it’s git’s quality control process.
As you may have guessed, in most projects not just anyone can approve a Pull Request. Controlling who has the ability to approve a pull request and merge code into the main branch is how big open sources (like Python itself!) allow anyone to contribute proposed changes (through pull requests) while still ensuring that only high quality code actually gets merged into the main branch and is released to users.
If you’re just collaborating with one or two people on an academic project, you may therefore not feel PRs are necessary — maybe it’s fine to just have everyone commit changes to the main branch! But even in small groups, PRs can be a good formal mechanism for ensuring you review one another’s code and are kept abreast of changes each person is making.
Part 1: Creating A Branch#
Exercise 1#
Still on Computer A, let’s create a new branch we can experiment on. We can do this in one of two ways:
We can type
git branch <new_branch_name>(to create the branch), thengit checkout <new_branch_name>to switch to that branch, orWe can type
git checkout -b <new_branch_name>to both create a new branch and switch to that branch.
“Switching” branches means that git (potentially) changes what files are visible to your computer and operating system. Because our new branch is, well… new, it still looks exactly the same as our main branch, so you won’t see any changes in your files. If you’re using Oh-My-Posh on Windows or Oh-My-Zsh on a Mac, though, you can see what branch your on by looking at your command line prompt. It should move from showing either “main” or “main” to your new branch name (here: “my_new_branch”) when you switch:
Note: the primary branch of a github repo USED to be called master, but as of late 2020 the default is not main, so you’ll likely see both for a while!
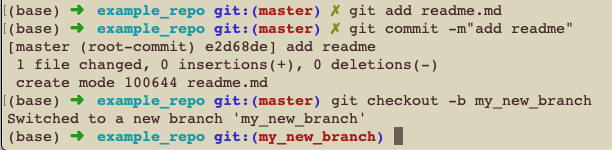
Now any changes you make and commit to the files in your repository will be changes made to the active branch, not to main.
Exercise 2#
Still on Computer A, let’s start writing some analysis code! Before we start, though, an important note: Git is only really build for simple, plaintext files, so please don’t use Jupyter Notebooks (we’ll discuss that in more detail below). You can use text files you edit and work with in VS Code, but not notebooks. For a refresher on how to use text files in VS Code (in a manner analogous to RStudio) see Jupyter Exercises.
OK, so now let’s create a regular Python (.py) analysis file in our repository. If you’re using Jupyter Lab, just create a new textfile, save it into the repository folder, then get to work (right-click the text file, select “Create Console for Editor”, then select Python 3 to create a kernel where you can run your code as you work).
In particular, import World Develoment Indicators from this url using pd.read_csv: nickeubank/MIDS_Data
And plot GDP per capita against Infant Mortality with this code:
import pandas as pd

world = pd.read_csv(
    "https://github.com/nickeubank/MIDS_Data/"
    "raw/refs/heads/master/World_Development_Indicators/"
    "wdi_small_tidy_2015.csv"
)
world = world.plot.scatter(
    "Mortality rate, infant (per 1,000 live births)",
    "GDP per capita (constant 2010 US$)",
)
Exercise 3#
Once you’re done, add and commit the new analysis file (from in your command line session). Then push these files to github.
When you try and push them to github, you will be told that you can’t push them because there’s no branch on github to receive the push:
fatal: The current branch test has no upstream branch.
To push the current branch and set the remote as upstream, use

    git push --set-upstream origin new_branch

To have this happen automatically for branches without a tracking
upstream, see 'push.autoSetupRemote' in 'git help config'.
That’s because you created your new branch locally, but it doesn’t exist yet on github.
Follow the helpful directions you’ve been given to push in a way that also tells github to make a branch to receive your push: git push --set-upstream origin [the name of your new branch]
Part 2: Creating A Pull Request#
Exercise 4#
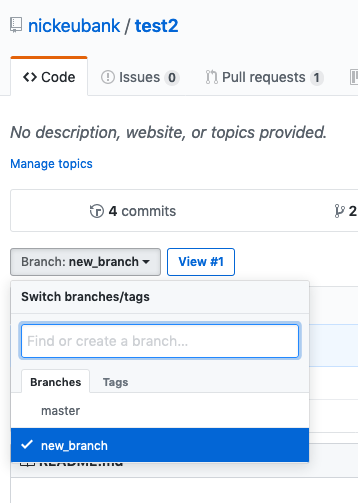
Now in your browswer, navigate to the repository on github. There, switch over to your new branch:
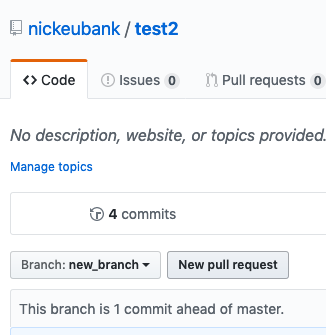
And look for the “Pull Request” button:
Exercise 5#
This should take you to a Pull Request screen where you can title your PR and add comments. In the comments, ask the person who has Computer B to review your PR (you can use the @ and their user name to address them. So type @otheruser would you please review this?. Then click “Submit Pull Request”.
Part 3: Reviewing a Pull Request#
Exercise 6#
Now on Computer B, navigate to the repository from your browser. You should now be able to see your partner’s PR.
From Computer B, review the PR from Computer A. You can do this on two levels:
Click on the “Files Changed” tab to see what code is being added or changed in this PR. You can also add comments here: click the plus sign that appears when you mouse over a number and leave a comment about a specific line of code (like “you need more comments to explain this code!”).
You can also pull this branch so you can run it on your own computer.
Exercise 7#
Let’s try the second strategy. On Computer B, clone the repository.
Exercise 8#
Navigate (from the command line) into the now cloned repository. By default, you should be on the main branch.
Remember when I said that switching branches changes the files visible to the operating system? Open your repository folder using your operating system (File Explorer or Finder) and look in it. If you’re on the main branch, you won’t see the new analysis file.
Exercise 9#
Now, from the command line, switch to the branch you’re reviewing for the PR (it should already be there, so you just have to do git checkout <branch_name>).
IF THE BRANCH ISN’T THERE: run git branch -l to see all the branches you’ve pulled just to be sure. If it isn’t there, you may have to pull it explicitly: run git pull origin <branch_name> (you don’t need the angle brackets, just making clear that’s where you put the name of the branch).
In this case, origin tells git you’re looking for a branch on the remote server whose alias is origin (this is the github repo that you cloned) whose name is branch_name. Then you should be able to check it out.
Exercise 10#
Now look at the folder using File Explorer or Finder again – see how the analysis file has appeared? Open it in VS Code on Computer B and see if you can get it to run.
Exercise 11#
Now go back to github and the PR, and suggest one change for the person who wrote the original code to make.
Part 4: Revising a Pull Request#
Updating a PR is no different from changing any project in github – just open your files, edit your code, then add, commit, and push your changes, and the changes manifest in the PR.
Exercise 11#
On Computer A, make the changes suggested by the Computer B reviewer. Add, commit, and push those changes.
Exercise 12#
On Computer B, look to see that those changes are present, then click “Merge this PR”! Now if you look at the main branch of your repository, you should see that the analysis file now appears on main.
Congratulations!#
You’ve completed your first full git / github cycle!
Tomorrow, the adventure continues!